Riverton, Utah High 88 Low 55
I've had a project that has been waiting on me since we went to Panguitch. While we were there we noticed that every time we used the kitchen sink, we could see water coming out from underneath the fifth wheel. I almost decided to see what the problem was while we were there, but the burrs in our spot were bad enough that I decided to wait until we got back to Riverton. Now I'm glad I waited.
Meanwhile it has been so hot that I really didn't want to work outside at all. It finally cooled off enough, and I'm all caught up with quilting Cindy's quilts, so I decided to tear into the under-belly cover and see what was going on.
It was a lot of work getting the bottom cover off with out tearing it, which would be hard to do anyway, but I had to cut around some hydraulic lines and a brake line.
I was hoping for an easy fix, but no such luck. after I got the cover down, I could see some cracks in the tank, which meant take it out. There are sensor wires and I knew the intake pipe had to be disconnected, but I didn't know about the vent, which gave me fits getting to it so I could cut the elbow out of the top enough to get it down. This later made for a lot rougher time putting the tank back, but I solved that problem by using plumber's couplings which use hose clamps around a stainless band around the rubber coupling (in case it ever need to come out again).
I thought at first maybe a rock had flown up and cracked the tank, but after thinking about it, it might have been damaged when we broke the spring in Oregon, I think that because I had a brake line rust through after a few trips from then.
These pictures don't quite show all the damage, because the rib in the middle of the tank had a crack
about halfway along the rib. I tried to see if I could get a replacement tank, but with shipping it would have cost almost $1000, not to mention the time it would take to get it, so I looked on YouTube to see if there were anyone that had repaired a tank. There were several and most of them just used ABS glue using acetone to clean the tank. The method I used said to make a little thicker paste using shavings from cutting ABS pipe and using fiberglass window screen instead of fiberglass fabric for reinforcement. The cloth doesn't allow enough glue to get through.
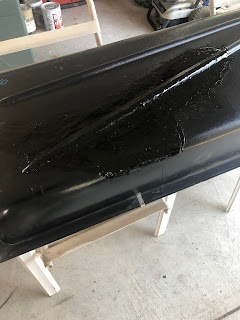
The next picture has the fiberglass on top of the tank ready for another coat of glue.
And here it is finished waiting to dry. From the glue you can now see how far the crack extended along the rib.
It takes a while for the glue to dry properly between coats, but I got it repaired to the point I felt good about putting it back in, so this morning early I started to replace the tank. It really would have been easier with help, but I finally got it done.
By the time I got to where I could put the under-belly back, it was almost too warm to work outside again, but I decided to finish it. At this point, all I have left are the inside pipe and the vent pipe to hook up, but they will wait until tomorrow morning.
Thanks for visiting.


Your a man of many talents……and lots of patience! And you saved a ton $$$$!
ReplyDeleteGreat job!
Why is it that repairs always are harder and take longer than we think they should. That is a very creative repair job. Good job.
ReplyDeleteWow ... GREAT job! Obviously there's no way I could ever do THAT!!! I'm impressed you could actually repair the tank. I'm hoping that never happens to me!!!!! I'm ready for some cool weather!
ReplyDelete